

Figure 1. Patient positioning, instrument setup, and portals.
1A: The patient is positioned in a beach-chair position with an articulating arm holder.
A Mayo stand is positioned contralaterally to hold arthroscopic equipment, including the camera, cautery, and anchors. 1B: A second Mayo stand is placed on the surgeon’s side with commonly used instruments, including a marker, spinal needle, scalpel, trocar, probe, and gauze. 1C: Surface landmarks and portal configuration: (1) coracoid process, (2) anterior portal, (3) anterolateral portal, (4) lateral portal, (5) posterolateral portal, (6) posterior portal, and (7) acromioclavicular joint. White circles indicate anteromedial and posteromedial anchor entry points. The red dotted line outlines the peri-acromial portal arc where portals are established. The yellow dotted line extends posteriorly from the apex of the “V” marking and approximates the glenohumeral joint line, guiding posterior portal placement.
1A: The patient is positioned in a beach-chair position with an articulating arm holder.
A Mayo stand is positioned contralaterally to hold arthroscopic equipment, including the camera, cautery, and anchors. 1B: A second Mayo stand is placed on the surgeon’s side with commonly used instruments, including a marker, spinal needle, scalpel, trocar, probe, and gauze. 1C: Surface landmarks and portal configuration: (1) coracoid process, (2) anterior portal, (3) anterolateral portal, (4) lateral portal, (5) posterolateral portal, (6) posterior portal, and (7) acromioclavicular joint. White circles indicate anteromedial and posteromedial anchor entry points. The red dotted line outlines the peri-acromial portal arc where portals are established. The yellow dotted line extends posteriorly from the apex of the “V” marking and approximates the glenohumeral joint line, guiding posterior portal placement.
Courtesy of Ashraf Hantouly, MD, MSc, and Moin Khan, MD, MSc, FRCSC
Published 7/28/2026
|
Ashraf Hantouly, MD, MSc; Moin Khan, MD, MSc, FRCSC
At a Glance
- Preoperative planning guides the repair; intraoperative assessment determines it.
- Early precision in portal placement prevents later technical compromise.
- Consistent, systematic evaluation is key to avoiding missed pathology.
Estimated read time: 4 minutes
Editor’s note: This article is part of “Orthopaedic Fundamentals,” a recurring AAOS Now series highlighting core principles widely embraced across the orthopaedic community. The series highlights ideas that can improve efficiency within and outside the OR, informing training surgeons as well as providing practical refreshers for experienced surgeons.
In this two-part installment on arthroscopic rotator cuff repair, part one focuses on preoperative planning, patient positioning, portal placement, and diagnostic arthroscopy. Part two examines tear assessment and fundamental principles of repair.
Rotator cuff tears are among the most common causes of shoulder pain and dysfunction, with increasing prevalence in both aging and athletic populations. Arthroscopic rotator cuff repair (RCR) is the standard treatment for many symptomatic rotator cuff tears, offering excellent visualization, minimal soft-tissue disruption, and reproducible outcomes. Successful repair requires meticulous preoperative planning, a systematic intraoperative approach, and attention to fundamental technical details. Mastering these foundational steps is essential, as failures and technical challenges often result from breakdowns in basics rather than advanced techniques.
Preoperative planning sets up the repair for success
Achieving a successful RCR begins before entering the operating room. An MRI assessment of tear size and pattern, tendon retraction, fatty infiltration, atrophy, and tissue quality helps guide repair strategy. Although repair planning should begin preoperatively, surgeons must remain flexible, as tear morphology and tissue quality may differ from imaging findings.
Pearl: Preoperative planning guides the repair; intraoperative assessment determines it.
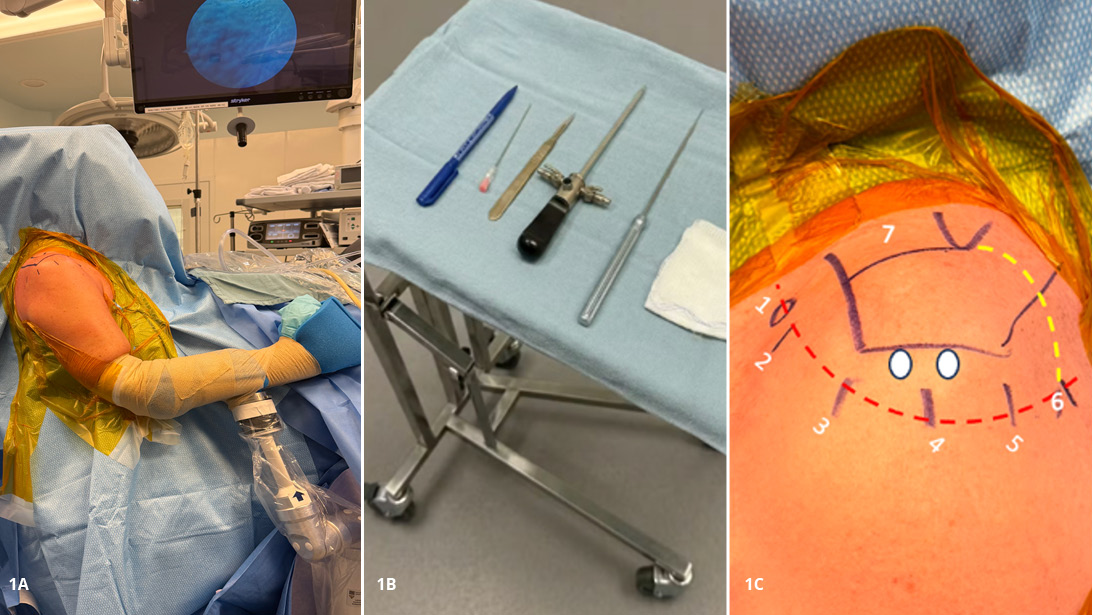
Figure 1. Patient positioning, instrument setup, and portals.
1A: The patient is positioned in a beach-chair position with an articulating arm holder. A Mayo stand is positioned contralaterally to hold arthroscopic equipment, including the camera, cautery, and anchors. 1B: A second Mayo stand is placed on the surgeon’s side with commonly used instruments, including a marker, spinal needle, scalpel, trocar, probe, and gauze. 1C: Surface landmarks and portal configuration: (1) coracoid process, (2) anterior portal, (3) anterolateral portal, (4) lateral portal, (5) posterolateral portal, (6) posterior portal, and (7) acromioclavicular joint. White circles indicate anteromedial and posteromedial anchor entry points. The red dotted line outlines the peri-acromial portal arc where portals are established. The yellow dotted line extends posteriorly from the apex of the “V” marking and approximates the glenohumeral joint line, guiding posterior portal placement.
1A: The patient is positioned in a beach-chair position with an articulating arm holder. A Mayo stand is positioned contralaterally to hold arthroscopic equipment, including the camera, cautery, and anchors. 1B: A second Mayo stand is placed on the surgeon’s side with commonly used instruments, including a marker, spinal needle, scalpel, trocar, probe, and gauze. 1C: Surface landmarks and portal configuration: (1) coracoid process, (2) anterior portal, (3) anterolateral portal, (4) lateral portal, (5) posterolateral portal, (6) posterior portal, and (7) acromioclavicular joint. White circles indicate anteromedial and posteromedial anchor entry points. The red dotted line outlines the peri-acromial portal arc where portals are established. The yellow dotted line extends posteriorly from the apex of the “V” marking and approximates the glenohumeral joint line, guiding posterior portal placement.
Courtesy of Ashraf Hantouly, MD, MSc, and Moin Khan, MD, MSc, FRCSC
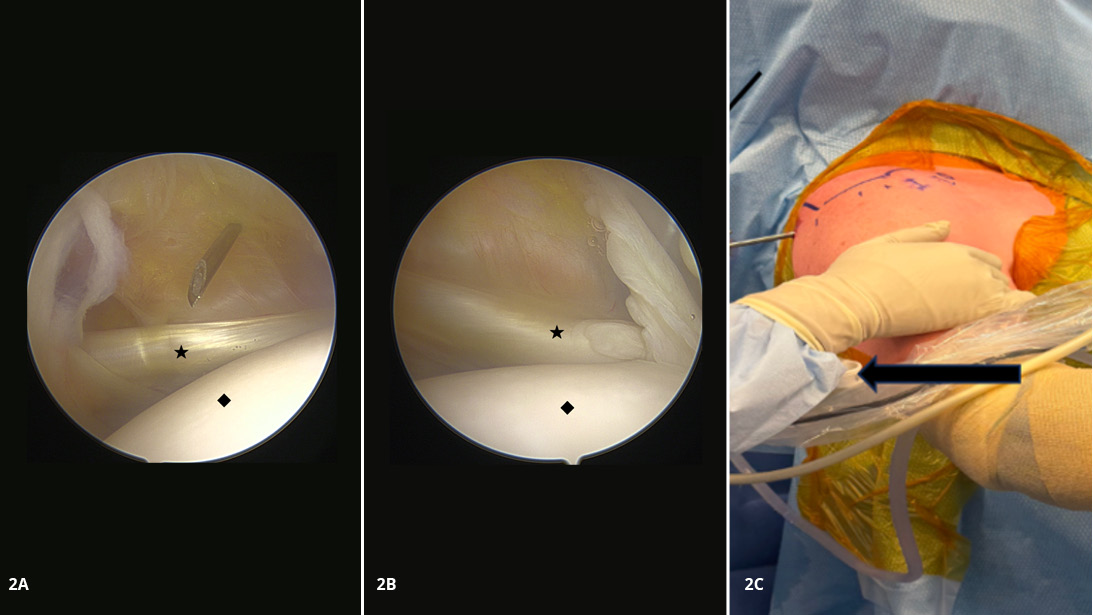
Figure 2A–B. Arthroscopic posterior portal view of the right shoulder.
2A: A needle is inserted into the rotator interval. 2B: The “down-and-out” viewing orientation demonstrates the upper insertion of the subscapularis tendon. The ★ indicates the subscapularis tendon and the ♦ symbol indicates the humeral head. 2C: The thin arrow indicates the camera orientation in the “down-and-out” view. The thick arrow indicates the posterior lever push facilitating visualization of the subscapularis tendon insertion as show in panel 2B.
2A: A needle is inserted into the rotator interval. 2B: The “down-and-out” viewing orientation demonstrates the upper insertion of the subscapularis tendon. The ★ indicates the subscapularis tendon and the ♦ symbol indicates the humeral head. 2C: The thin arrow indicates the camera orientation in the “down-and-out” view. The thick arrow indicates the posterior lever push facilitating visualization of the subscapularis tendon insertion as show in panel 2B.
Courtesy of Ashraf Hantouly, MD, MSc, and Moin Khan, MD, MSc, FRCSC
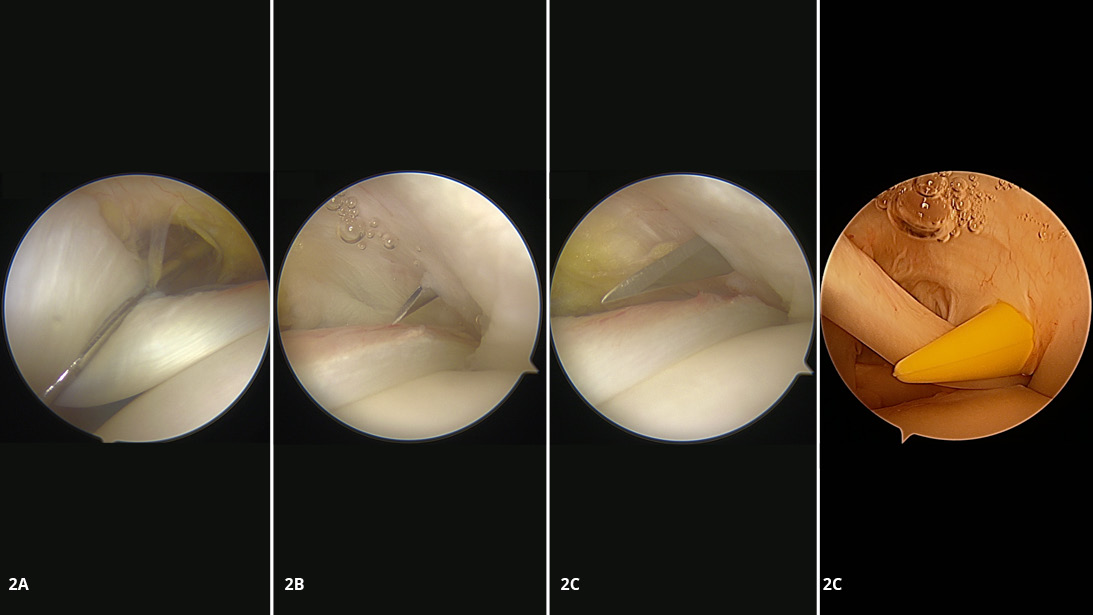
Figure 3A–D. Posterior portal arthroscopic views of the right shoulder demonstrating high interval portal establishment.
3A: A probe introduced through the anterior portal displaces the long head of the biceps tendon medially, improving visualization and defining a safe working corridor. 3B: A spinal needle is used to localize the optimal portal trajectory, positioned just anterior to the supraspinatus and lateral to the long head of the biceps tendon. 3C: A small skin incision is created, and the blade is advanced along the same trajectory as the spinal needle, with the bevel oriented upward to protect the long head of the biceps tendon during capsular entry. 3D: A cannula (≥8 mm) is inserted through the established tract.
3A: A probe introduced through the anterior portal displaces the long head of the biceps tendon medially, improving visualization and defining a safe working corridor. 3B: A spinal needle is used to localize the optimal portal trajectory, positioned just anterior to the supraspinatus and lateral to the long head of the biceps tendon. 3C: A small skin incision is created, and the blade is advanced along the same trajectory as the spinal needle, with the bevel oriented upward to protect the long head of the biceps tendon during capsular entry. 3D: A cannula (≥8 mm) is inserted through the established tract.
Courtesy of Ashraf Hantouly, MD, MSc, and Moin Khan, MD, MSc, FRCSC
Optimize patient positioning, equipment setup, and fluid management
Patient positioning and instrument setup
Proper setup is fundamental, as it simplifies execution and minimizes intraoperative challenges.
Both beach chair and lateral decubitus positions are widely used. Stable head and neck support prevents unintended movement, while the use of an articulating limb-positioning device allows controlled and reproducible arm manipulation throughout the procedure. Equally important is a standardized and consistent instrument setup, which improves surgical efficiency and flow (Figure 1B).
Pump pressures should be kept as low as possible while maintaining visualization (typically about 40 mmHg). Excessive pressure can increase swelling and obscure landmarks. Epinephrine-containing irrigation fluid, tranexamic acid, and meticulous hemostasis are often more effective than increasing pump pressure alone. Temporary increases in pressure using the lavage (boost) function should be reserved for brief periods when visualization deteriorates.
Pearl: Prioritize stepwise hemostasis before increasing fluid pressure.
Optimize portal placement to improve visualization and instrument access
Accurate portal placement is a critical determinant of visualization, instrument access, and anchor trajectory.
The posterior portal is typically established approximately 2 cm medial and 2 cm inferior to the posterolateral corner of the acromion, within the “soft spot.” Gentle posterior translation of the humeral head can help delineate this interval. Additionally, surface markings of the acromion may aid orientation; in particular, the apex of the “V” marking provides an approximate reference to the glenohumeral joint line where the posterior portal is established (Figure 1C).
A spinal needle is valuable for confirming trajectory before incision. The anterior portal is created just lateral to the coracoid process, typically about 1 cm lateral and directly above the subscapularis tendon under direct visualization (Figure 2A).
Poorly positioned portals may result in instrument crowding or suboptimal anchor angles, problems that are difficult to correct later in the procedure. Therefore, thoughtful portal planning early in the case prevents downstream technical challenges.
Pearl: Early precision in portal placement prevents later technical compromise.
---
Related Content
----
Diagnostic arthroscopy requires a systematic intra-articular evaluation
Intra-articular evaluation
A systematic diagnostic arthroscopy is essential and should never be overlooked. A structured intra-articular evaluation ensures that associated pathology is not missed, including assessment of the humeral head and glenoid cartilage, long head biceps tendon (LHBT) and anchor, subscapularis tendon, rotator interval, anterior and posterior labrum, axillary pouch, and rotator cuff.
Optimal visualization of the subscapularis and biceps is achieved using a down-and-out viewing position combined with 30-degree forward flexion and posterior lever push on the humeral head as demonstrated in Figure 2B and Figure 2C.
Establishing the high rotator interval portal (or anterosuperior lateral portal) requires precise trajectory with a spinal needle, followed by controlled capsular entry to avoid iatrogenic injury to the LHBT. A probe is introduced to gently medialize the LHBT within the joint, optimizing visualization and defining a safe working corridor (Figure 3A). A spinal needle is then used to localize the portal trajectory, positioned just anterior to the supraspinatus and lateral to the LHBT (Figure 3B). After confirming appropriate placement, a small skin incision is made. The blade is advanced along the same trajectory as the spinal needle, with the bevel oriented upward to protect the LHBT during capsular entry (Figure 3C). A cannula of at least 8 mm in diameter is subsequently inserted through the established tract (Figure 3D). This portal is helpful by providing unobstructed access to the anterosuperior glenoid, the biceps origin, and the superior labrum. It can also serve as an additional accessory portal for visualization, instrumentation, or suture management in rotator cuff repair.
Pearl: Consistent, systematic evaluation is key to avoiding missed pathology.
Subacromial space evaluation
After transitioning to the subacromial space, a thorough bursectomy is essential for visualization. The coracoacromial ligament should be identified, and the lateral portal is typically established approximately 2-3 cm distal to the acromion. Adequate clearance of the lateral space is particularly important to facilitate suture management and ensure space for lateral row anchors. Posterolateral and anterolateral portals are used to assist viewing and suture management if needed (Figure 4A).
Bleeding, often originating from the medial or posteromedial subacromial region, is best avoided by clearing the bursa laterally rather than medially. When encountered, it should be managed systematically with direct visualization, keeping the camera close to the bleeding source, followed by targeted coagulation and optimization of inflow and systemic blood pressure.
Pearl: Thoughtful portal placement facilitates bleeding control and maintains visualization.
Successful rotator cuff repair begins with meticulous preparation, systematic diagnostic evaluation, and optimization of visualization. These foundational principles allow surgeons to accurately define pathology and create the conditions necessary for a durable repair. In part two, we examine tear assessment and the core technical principles that guide successful rotator cuff repair.
Ashraf Hantouly, MD, MSc, is a fellowship-trained orthopaedic surgeon with a specialized focus on shoulder and knee sports injuries.
Moin Khan, MD, MSc, FRCSC, is an associate professor of orthopaedic surgery at McMaster University, with a focus on sports medicine and shoulder surgery.